Wednesday, September 27, 2017

My Must Have Accessory!

How many of you have a favorite piece of jewelry that you can wear with anything? Me!!! How about a piece of jewelry that your spouse can wear with anything? (Yes, even your non-jewelry-wearing spouse ;) ) Me again!!  But it was until recently that I discovered it, and it makes the PERFECT gift for the upcoming holidays!

ATTN: Details on a Giveaway at the end of this post!

I'm all about things that are functional, and so is my hubby, so watches make a lot of sense for us...ya know, because they're useful! So let me talk to the girls for a second: Can I get an amen if you find yourself not being able to wear one of your favorite watches because it doesn't match your outfit because either the silver or gold clashes!? I know I have that problem ! I actually have a silver watch to go with all the black, gray and silver outfits, and then have a brown and gold watch to go with brown, tan and gold outfits... which isn't a problem at all ! BUT sometimes you just want that watch to match with all things, am I right??

How about the guys... if they're anything like my hubby, they don't care at all about matching, but they don't want anything too flashy... and let's not forget, it's gotta be COMFORTABLE. #priorities
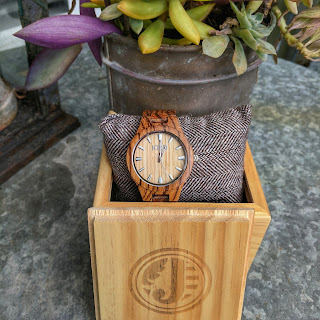
JORD Fieldcrest Watch
FieldCrest Zebrawood & Maple
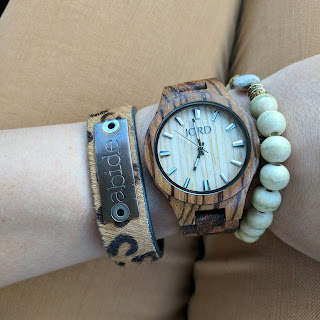
Let me solve everyone's problems reallllllll quick! Not too long ago I stumbled across JORD Wood Watches and quickly fell in love with their wooden watches that had such a unique look and design. The really were such cool watches, I had to try one out. After ordering the Fieldcrest, pictured, I fell in love even more when it arrived! First thing that I noticed was the beautiful packaging (First impressions are everything, right!?) which was equipped with a wooden storage box, cleaning cloth, and preservation oil for your wood watch! This is included for both the women's wooden watches and the men's wooden watches.


JORD Fieldcrest Watch
FieldCrest Zebrawood & Maple

JORD Fieldcrest Watch
FieldCrest Zebrawood & Maple


The next thing I LOVED was how light and comfortable the wood watch is, AND goes with everything! Black, brown, gold, silver... NO CLASHING! #DreamComeTrue

 I know what I'll be getting all my girlfriends and women in my family for Christmas, lol!


This particular watch is a technically a unisex watch, but hubby wasn't loving the Zebra wood on the band, so we picked out another unisex style called the Frankie that he would wear! Buttttt I had to test it out first, naturally, ha! We ordered the Frankie in Koa & Ash color....

JORD Frankie Watch
Frankie Koa & Ash

And it's PERFECT!! I can easily dress it up with some fun jewelry for any occasion, and again, it can go with the black or brown colors! It is a good bit bigger than the Fieldcrest, so it's a fun statement on a girls wrist!
JORD Frankie Watch
Frankie Koa & Ash


JORD Frankie Watch
Frankie Koa & Ash


It can just as easily be dressed down for everyday wear or even to spice up your activewear if you live in activewear like I do!


JORD Frankie Watch
Frankie Koa & Ash


Then for hubs, it's perfectly sized for his wrist, not too big and not too small, and passed the "light and comfortable" test! Those next two are him, I promise my arms aren't that big and hairy, lol!  

Frankie Koa & Ash

Frankie Koa & Ash


I really used to be a Fossil watch girl... and then JORD happened. Stay tuned for an update with a His and Her's photo shoot to show you what they look like on! 

JORD Frankie Watch

In the meantime, I'm INCREDIBLY excited to let ya'll know that JORD is doing a GIVEAWAY!!!! What started my whole JORD obsession was when I entered one of their giveaways and won a gift card!! SOOOOOOO, the giveaway will run from now through October, and close on 10/29/17 at 11:59pm. EVERY person who enters will receive a $25 gift card to JORD for any of their gorgeous unique men's watches or women's watches, and one lucky person will win a $100 gift card!! Gift cards are to be used by 12/31/17, just in time for Christmas presents!! :) You may enter the giveaway below, YAY!!! 

ENTER GIVEAWAY HERE! 


Feel free to share with friends and family! Everyone gets a gift card! :) 

Xoxo Tay


Saturday, June 10, 2017

Try My June Bootcamp for a Week FREE! 💕

 Click  >>>>HERE! <<<<< Select the bottom right option with the 14 day free trial! Fill out the appropriate information and make sure it says Taylor Buckley (me!) Is your coach! Let's rock !! 💕

Thursday, April 20, 2017

Super Cute Activewear That Doesn't Break The Bank

Happy Thursday everyone! <3


So, as a health and fitness coach, I LIVE in activewear... but even if I wasn't a coach, I'd still live in it, and I know many of you do too! Working outs --> activewear; Out to lunch --> activewear; Running errands --> activewear; Movie night --> activewear. We're all guilty! Nothing is better than a good pair of leggings (that pass the see-through test, of course) and a fun sports bra, lets be honest ;) 

But that can get a little... pricey. I mean a pair of Nike or Lulu leggings are going to run you anywhere from $50-$140 and that's just for the bottom half! So I'm always on the search for a solid athletic brand that doesn't run my bank account dry but also doesn't sacrifice the QUALITY of the material. (No one likes pulling their leggings up 1,000 times during their workout because they stretched out and are falling off!) Then I found Fabletics, which I love and was sucked into with the $49.95/month "for a full outfit" line, and though my first "outfit" which truly was just a top and a bottom was fairly inexpensive, I found myself wanting a FULL outfit- leggings, sports bra, and top, and that running me anywhere from $69-$89 a month... not the $49.95 I was anticipating. 

Now, I love Fabletics, don't get me wrong! It's still a heck of a lot cheaper than my one pair of Nike leggings, and SUPER nice quality, but it was definitely getting really expensive. Then I stumbled across Ellie Activewear!! 

Ellie Activewear is a seasonal subscription box sent to you monthly for $49.95 (fixed amount!) that ALWAYS includes a workout top, a sports bra, and leggings/capris, so a FULL outfit (what I wanted!) and 2 fitness accessories/workout equipment, which I thought was SO neat! I got a TON of questions about what makes Ellie different than Fabletics, so lets break it down a little bit! 

Fabletics: 
- Monthly clothing shipments start at $49.95 for 2 pieces of clothing, and go up from there in price for 3 pieces. (I was averaging about $89 for leggings and a sports bra and a tank) 
- Has a full online shop where you can buy whatever you want in addition to your monthly shipment
- You may skip the month if you don't see anything you like. 

Ellie
- Set subscription box of one cohesive full outfit (3 pieces), and 2 fitness accessories/workout equipment each month for a fixed price of $49.95 
- Equipment/accessories vary from water bottles, to shaker bottles, to towels, to yoga mats, to foam rollers, to resistance bands, all kinds of stuff!
- Entire box is cohesive in color cordinating
- Each month's box is different and you may preview the next month to decide whether you would like to order it. 
- You may skip months if you do not like that current box. 

So Ellie tries to give you everything you need to jumpstart your fitness journey in each monthly box, from an outfit to accessories, for a flat rate! Its really a great way to start to build your home workout area slowly with the fitness equipment!

Here's what I got in my April box!


1) A black seamless strappy sportbra (S)
2) Black (ridiculously soft) leggings with ankle cutouts (S)
3) Mesh back dryfit tank top (M)
4) Headband and no bump hair ties
5) Magnetic gym towel

Though I was a tad worried about the leggings looking more like capris than full length pants because I'm so tall, I found that everything was true to size and a very flattering fit! Not to mention, SO comfortable! (Seriously these are the softest athletic leggings I own)

Sports Bra and Leggings!
Tank Top and Leggings!


Look how cute the little cutouts are at the bottom!

Overall I was SO pleased with everything I got and an looking forward to see what they have planned for their May box! :) Has anyone else tried Ellie Activewear?! 

Swing over to their website & grab your April box before they're gone! <3 
--> https://www.ellie.com/ <--


Friday, December 16, 2016

DIY Friday!

It's Friday again! That means another DIY Farmhouse Fix for Less!! 

Today's project is less about the step by step of this specific project, and more about getting you to think outside the box with the things in your own home to transform them into something more functional for your lifestyle! :) 


So, when we moved our new house in September, our entertainment center was an older one that was my parents at some point, and had traveled with me through both undergrad and gradschool dorming, housing, ect. It had seen better days, but it had been a trusty TV, Playstation 4, and Nintendo 64 holder (ya know, the essentials) for quite a while. Chad decided to build a GORGEOUS entertainment center for our new home, so naturally, our sad little old one was of not much use anymore. 


It sat in the guest room for quite a while not doing a whole lot, but after we started our entry way project, I knew I wanted a bench to go underneath that. One day I was putting things away in the guest room and sat down on the entertainment center just for a break and realized it was perfect bench height!


So I asked Chad how feasible it would be to make this old entertainment center a bench, and he said we could give it a shot!

So we popped off the top and took off the glass doors. 

Chad then cut plywood to fit the size of the door opening and attached framing the replicate a barn door look. This plywood piece slid right in where the glass doors previously were.

Then we took 2, 2x12's and cut them to the appropriate length, put a brace on the bottom, and hinges on the back so that we could store things in the bench!

With some dark brown stain for the top and some Antique White paint for the body, we had a repurposed entertainment center that was now a bench! 


Unfortunately, when we put it in the hall way, it didn't quite fit the vision we had for an entryway bench; it was just a little too wide! 


So we found a new home for it as a cute nook coffee/reading area and I store all my seasonal decor inside of it!


I know that this DIY wasn't super specific with instruction, but like I said, its more about getting you to think outside the box with the pieces you already have! :) Whether its repainting, re-covering, re-finishing, antiquing, aging, whatever it may be! Take a look around your home for things you can put a new twist on and repurpose :) 

Happy Friday y'all! <3


Friday, December 9, 2016

DIY Friday!

Woohooo!!!! Happy Friday Loves!!! 

Look who has their DIY Friday post up ACTUALLY on Friday! #Winning 

Soooooo this week's projects is SUPER easy, but SUPER worth it if you're into that wall art! 

What you'll need: 

- A long, narrow piece of wood
- Paint (I used white and black)
- Sponge brushes
- Stencils
-120 grade sandpaper

In the boutiques in our town, there are TONS of rustic signs you can get to hang on your wall that have the town name, or say "Kitchen" or "Farmhouse", etc. like the ones below: 


And they sell for anywhere from $40-$80 a piece! Even more sometimes if you want it personalized with your family last name or coordinates of a location.

I wanted a rustic sign that either said Farmhouse or Tallahassee, but just couldn't bring myself to pay that much for one!  Sooooo I made one :) 

All you need is a board to the size of your liking (mine is left over plywood from one of my husband's projects). Mine is about 5 feet long.


Next, I went to Hobby Lobby to get some BIG 10in stencils for the lettering... and they were $25... so I figured I'd wait a little bit and ended up finding some at Target for $3!!! I grabbed those, sponge brushes for $2, and black acrylic paint for $2. ($7 total)

We had white paint left over from our entertainment center, so I put a white-ish coat of paint on the face of the board, let it dry, then got to stenciling! I am still getting used to documenting my projects, so I apologize for the lack of photos for each step! I put the stencils down (no, I did not tape them, the not-so-perfect letters where the paint bled a little added to the rustic look!), and sponge painted the letters with the black paint and let that dry. Then I took the 120 sand paper and sanded the whole thing, lightly. 


You can see the scratches and distressing in the paint! Which I thought was enough. Sand to your liking though :) 


You can see the stencils, sand paper and sponge brushes in this picture, so I didn't completely photo fail! 

Then we hung it up! Ta-da!!! A custom $80 rustic wood sign for $7 :) 


Now the more I look at it, the more I think I want to sand ours a little more, ha! 

Anyway, enjoy!! :) 

I'd love if ya'll posted your signs below if you make one :) 

Happy Fri-yay! <3


Thursday, December 8, 2016

How to Create a Smaller Waist

Happy Thursday loves!

How many of you watched the Victoria's Secret runway fashion show this week? I know I did. I watch it every year, but this year was different. For YEARS I've watched that fashion show and coveted everything about those women because for the longest time, I wanted to BE one. I'm 5'10" and when I was younger, I thought that because I'm the same height they are, I could make my body look like theirs... That's how it works, right? Everyone that is the same height can look the exact same? WRONG. But I was naive then, and so consumed in my body dysmorphia and eating disorder that to me that made sense. I had read somewhere that the average weight for a Victoria's Secret model was 112lbs at 5'11. I don't remember where I read that, it was years ago, but that number stuck in my head, and became what I strived for....but when I finally hit that weight at the pit of my eating disorder, I STILL didn't look like them, go figure. 


NEWS FLASH! Everyone is build different, everyone has different bone structure, everyone carries weight different, everyone distributes their fat different, everyone retains water different, everyone develops muscle different, EVERYONE is different, and EVERYONE is BEAUTIFUL!!! I just didn't see it then. 

Now its easy to see that I'm not built like a VS model, period! Many ladies aren't and that's OKAY! You're perfect anyway :) 


Even though I was the SAME height and the SAME weight they were, I was shaped so differently. I'm built pretty broad, with wider shoulders and wider ribs, narrow hips and ZERO waist.... more like a 12 year old boy that a runway model, ha! I also have scoliosis so one of my wide set ribs sticks out further than the other. NONE of these things scream VS model, but for years I tried to mold myself into something I physically couldn't be... it wasn't realistic, and this year I was able to watch the show in a whole new light. 

I was happy for those women who ARE built like that, and CAN be those VS angels! Rock on girls! But I was also happy for myself, for doing with my body what I'M built like and what I CAN be, and that's STRONG and FUNCTIONAL! 

Do I weigh 112lbs? Nope! Almost 40 pounds more than that, but I can enjoy food with family, sweet treats, and the occasional drink without stress. Do I have a little tiny waist? Nope! But my core can support myself through carrying heavy things on my back, picking things up, and protecting my organs. Do I have a thigh gap? Nope! My legs touch all the way to my knees, but they can jump high, sprint, climb, carry heavy things...save my phone from falling in the toilet and hold lots of puppies in my lap :) Do I have thin, slender arms? Nope! But they can defend me in tussles, make one trip for my groceries, and pull me up COMPLETELY if I'm hanging off a ledge. ( I have this weird thing where I HAVE to be able to do pullups in the rare event that I may be hanging on the side of a cliff or something and need to pull myself up... no waiting around for rescue, gotta be strong ;) ) 

I'm not built like a VS model, but my body is functional and strong and that's all that matter to me! :) Embrace your body for what it CAN be and love it! <3

Now, you're probably thinking, what the heck does this blog title have to do with the rant you just went on? Well, you can't make your body something it isn't. I DON'T have a small waist, or any waist for that matter, and because that was something I focused on so heavily when I watched the fashion show, I'm SURE I'm not the only one that had that thought! I wanted to share with YOU you're not alone :) Even though we might not have tiny waists, we can create the illusion of having one by shaping the rest of our body. Muscles can be shaped, bone structure cannot (should not). Soooooo, how do you create a smaller waist?! By growing the things around your waist!! Your back, shoulders and booty! :) 

By growing my booty and back muscles a little, I've been able to create the illusion that I somewhat have a waist! My booty workouts are on on my Hump Day post, but here is a killer Back and Bicep workout that will tone your back and arms and help with the waist illusion! :) 


Super Sets: 

Lat Pulldowns- 3 sets of 12
Crazy 7's- 3 sets 
(theses are bicep curls where you hold the weights stationary with your elbows at 90 degrees, then on one side, do 7 curls, while the other arm is still holding at 90 degrees. Then switch, do 7 reps with the opposite arm and hold with the one you just did curls on. Continue in that fashion for 6,5,4,3,2,1, KILLER!)

Low Cable Rows- 3 sets of 10
Reverse Curls- 3 sets of 10 

Chin ups- 3 sets of 12
Dumbbell rows 3- sets of 12 each arm

Single Arm Rotating lat pulldowns- 3 sets of 12 each arm
Dumbbell bicep curls- 3 sets of 10

Dumbbell bent over rows- 3 sets of 1-
3 way cable bicep curls- 3 sets of 7 each direction (outward, front, inward.)

Wide Fly Burnout
 (start with the heaviest weight you can, and do as many reps as you can, then do a little less weight for as many reps and you can, etc. until you run out of dumbbells! ) 
Hammer Curl Burnout (Same fashion!)

Enjoy! :) 


Wednesday, November 30, 2016

Hump Day!

Happy Happy Humpday everyone! 

You know what's the worst? When its leg day and you're STILL sore from the last leg day... Ouch! 

I train legs 3 times a week... Monday's and Friday's I train Hamstrings and glutes, Wednesday's I train Quads and glutes, so today was Quads and Glutes day!

Today's workout was fairly short and sweet, but DEFINITELY to the point! 

Warm up:
Dynamic Stretching of your choice! (Don't skip this part... you'll regret it, I promise!)

Back Squat Work-up:

10 reps
8 reps
6 reps
4 reps
2 reps

The goal of this Work-up is to start with moderately challenging weight for the first set of 10 reps, then continue to increase your weight until you get to the 2 rep set, which by this time should be close to your maximum squat weight! Knowing that, increase accordingly per set :) 

Wide stance back squat 
3 sets of 8 reps, heavy 

Barbell Split Squats (this one is BRUTAL heavy) 
3 sets of 8, each leg, heavy 

Tri-Set
Dumbbell step-ups 
2 sets of 10, each leg

Glute push downs on the assisted pull-up machine
2 sets of 10 

Dumbbell Lateral lunges with a leg raise
2 sets of 8, each leg 

Superset: 
Glute Kickback Machine 
3 sets of 8 with an 8 pulse at the top on the last rep

Quad extensions
3 sets of burnouts, single leg and double leg 


Que booty pump, then limp out of the gym, haha! 

But seriously, my legs gave out walking back to the locker room to get my stuff, I was SO embarrassed!

Give that routine a shot and let me know what you think! Enjoy :)